When it comes to the security of your home or office, a surveillance system like a Blink Camera plays a crucial role. However, there may be times when you need to remove your Blink Camera from its mount. Perhaps you need to change its location, perform some routine maintenance, upgrade it with a newer model, or completely remove it for other reasons. Although detaching the camera from its mount might seem like a straightforward task, doing it incorrectly can potentially damage the device.
This article provides comprehensive instructions to help you carefully unmount your Blink Camera. It will guide you through each action you need to take, minimizing the risk of damaging the camera or its mount in the process. We have taken into account the different models of Blink Cameras to ensure you find this guide helpful, irrespective of the specific model you possess.
Remember that safety comes first, and getting acquainted with the proper procedure to handle your surveillance system will only add to your home security skills. This guide aims to equip you with the right knowledge to handle your Blink Camera with confidence during removal or any related manipulation. Let’s delve in and explore how to do it right.
Deciphering the Mounting System for Your Blink Security Camera
Before undertaking the process of removing a Blink security camera from its mount, it’s critical to have a clear comprehension of the camera’s mounting system. This will not only ensure maximum safety during the procedure but also prolong the life of the device.
The mounting apparatus for Blink cameras has been designed with user-friendliness in mind. Its design facilitates smooth installation of the camera in various locations and environments, and can also be utilised for both indoor and outdoor cameras.
Components of the Blink Camera Mount
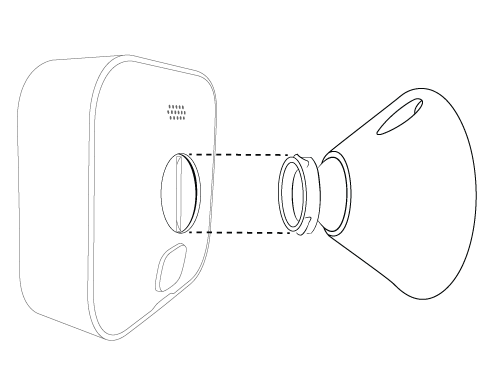
The Blink camera mounting system consists of two primary components:
- The camera unit.
- The mount.
The camera unit comprises a removable back cover that accommodates the installation of batteries and a notched wheel at the base that fits into the mount.
The mount, on the other hand, includes a base and a ball joint. The base is built to sit flush against flat surfaces while the ball joint allows for angle adjustments of the camera. To ensure secure hold, the mount is affixed usually through screws to the desired location.
When the camera unit is affixed to the mount, it can move around flexibly within a reasonable scope (up to 360 degrees), allowing you to find the optimal angle for surveillance.
The understanding of these components is essential for safely removing the camera from the mount, whether for battery replacement, device cleaning, or relocating the camera.
In conclusion, the mounting arrangement for the Blink camera is simple yet robust, contributing to both the effectiveness and the versatility of the surveillance device.
Key Equipment Needed for Uninstalling Blink Security Camera from its Bracket
When it comes to detaching your Blink security camera from its mount, having the right equipment at hand will make a significant difference. Although Blink cameras are designed to be easy to set up and remove, having the right tools can make the process safe and hassle-free.
Important Tools You’ll Need
- Screwdriver: A screwdriver is perhaps the most vital tool you will need for this task. A type called ‘Phillip’s head’ is commonly used for Blink devices. This tool will allow you to loose the screws keeping the Blink camera attached to its mount.
- Step Ladder: In some cases, especially if the camera is installed high, a step ladder can come in handy. It will provide you with the necessary height to reach the camera and remove it without struggling or compromising on safety.
- Protective Gloves: Disassembling electronic devices may expose you to sharp edges. Wearing protective gloves is a wise measure to shield your hands from potential cuts or scrapes.
- Small Container: This is not a tool per se, but it’s incredibly useful. Screws can be easy to misplace, so as you remove them, putting them in a small container for safekeeping is a good idea.
With these essential tools at hand, you’ll find it much easier and safe to unmount your Blink camera from its bracket. Remember, the most critical factor for a successful removal lies not just in the correct tools, but also in a careful and patient manner of execution. Take your time and ensure you follow a step-by-step guide carefully to avoid damaging the camera or the mount during the removal process.
Essential Safety Measures prior to the Process of Detaching the Blink Security Device from its Mount
Before you initiate the process of dislodging your Blink Security camera from its fixture, it is vital to take a few precautions to ensure safety and mitigate any risk of damage to the device. These safety measures will not only guard your personal safety but also prolong the life of your security unit.
Ensure a Safe Environment
First and foremost, it’s important to ensure the removal area is safe. This implies that the area should not be wet or slippery, and there should not be any electrical wires hanging loose that might potentially cause harm. If the camera is installed in a high place, using a stable ladder or a sturdy stool is recommended.
Power Off the Device
The next critical step is to completely turn off the security camera. Disconnect the device from its power source to avoid any chance of electrocution. This is also a safe practice to avoid any software damage to your camera.
Handling the Device with Care
Security cameras, such as the Blink model, are delicate devices and mishandling them can lead to damage. Therefore, it is essential to handle the device with care during removal. Ensure your hands are dry and clean before touching the camera. Use palm or finger gloves if available to protect the device from dirt or fingerprints.
Keeping the Necessary Tools Ready
Before starting the process, ensure all necessary tools, like screwdriver or a drill, required for the detachment process are at hand. This prevents any damage that could occur due to the use of incorrect or inadequate tools.
Protection Against Elements
Lastly, consider the weather conditions at the time of removal, especially for outdoor cameras. Avoid carrying out this operation in unfavorable conditions such as heavy rain, wind or lightning that can potentially damage the device or hamper your safety.
Treating these precautions with the due importance they deserve will ensure a safe and successful removal of your Blink security camera from its mounting location.
First Step: Turning Off Your Security Camera from Blink
The initial step to safely detaching your Blink surveillance camera from its mount involves powering it down. There are some vital reasons for this. Predominantly, turning the camera off helps to prevent any possible short circuits or electrical shocks. Plus, it prevents the camera from recording or taking pictures when it’s getting removed, ensuring your privacy.
Remember that turning off is as crucial as correctly removing it from the mount as improper handling can inadvertently damage the camera system. Therefore, here is how you should be properly powering down your Blink protection camera:
- Firstly, go to the Blink app on your smartphone or tablet.
- Once you’ve opened the app, select the camera you want to power down from the list of connected cameras.
- Upon selecting the camera, find the settings option within the app and navigate to the power option.
- From there, select the power off or shut down option. Your camera will now be powered off and be ready to be securely dismounted from the mount.
Note: Ensure that your system is not recording or has any scheduled recording before powering it down. If it’s compulsory, remember to cancel any active recording/in progress before you initiate the shutdown process. It’s a crucial step not to overlook as it can cause possible system errors or recordings loss if neglected.
In conclusion, proper powering down of your Blink camera is a prudent step that can significantly contribute towards its prolonged lifespan and excellent performance. Thus, always remember to follow this guide to safely power down your device before any dismounting attempt.
Disconnecting the Blink Security Camera from its Power Supply: Follow These Steps
The second step in safely removing your Blink Security Camera from its mount involves correctly disengaging the power supply. It is crucial to remember that you must not rush this procedure. Hastily or incorrectly disconnecting the device from its power source could result in device damage or possible harm to you. Here’s how you can securely disconnect your Blink camera from the power source:
Ensure the Camera is Off
First and foremost, you should make sure that your camera is turned off. Continuing with the disconnection process without switching off the device can be dangerous.
Locate the Power Cable
Identify the power cable that is connecting your Blink camera to the power source. It is usually a small wire that runs from the back of the camera to the wall socket or power extension.
Safely Remove the Power Cord
Once you’ve identified the power cord, proceed with carefully disconnecting it. Gently remove the power cord from the power source, then from the camera. It’s critical to not tug or pull forcefully.
Securing the Power Cord
After disconnecting the power cord, ensure its safe storage. Wrapping the cord loosely around your hand or a cord reel can help avoid any possible damage or tangling.
Note: Always take care while handling electronic devices and power sources. If you’re not confident or comfortable with the process, it’s advised to seek professional help. Safety should always be your utmost priority.
Process of Unfastening the Blink Camera’s Mounting Screws Safely
Preparing to Loosen the Mounting Screws
After switching off your camera as described in the initial procedures, the next move in safely removing your Blink surveillance device from its mount is to work on the mounting screws. Prior to loosening the securing screws, ensure to have a screwdriver that perfectly fits the screws’ heads. Having a sizable workspace to hold the screws securely is also crucial, as dropping them might lead to damage or loss.
First, locate the mounting screws of the camera. These are usually positioned at the base of the camera mount. Different models of Blink security cameras may have varying number of screws. If you are having difficulty locating these, refer to your user manual or seek professional help to avoid causing damage to your device.
Procedure for Unfastening the Mounting Screws
Once you’re ready to proceed, use your suitable screwdriver to gently but firmly turn the screw anti-clockwise. Remember, exercising a bit of caution while performing this step is very important. Do it slowly to avoid stripping the screws or causing any form of damage to the camera.
As you unscrew, apply consistent pressure to keep the screwdriver engaged with the head of the screw. If the screwdriver keeps slipping off the screw, attempt repositioning it or using a different screwdriver. Some screws may be slightly tighter than others, requiring you to apply more force.
Collecting and Storing the Removed Screws
Once the screws are loosened, collect them carefully. Lost screws can lead to problems during reinstallation. To prevent this, consider using a magnet or magnetic bowl to hold onto the screws once they’ve been removed.
In conclusion, unscrewing the mounting brackets of your Blink surveillance camera carefully and patiently will ensure safe removal while also keeping your camera intact for future use.
Phase Four: Unhooking the Blink Security Camera from its Stand
The fourth step towards carefully removing your Blink surveillance camera from its mount involves disconnecting the digital monitoring device from its attachment point. Achieving this is quite straightforward. However, you must do it cautiously to prevent damaging your camera or its mount.
Ensuring the Camera is Off
As a fundamental safety measure, before you start the detachment process, confirm that the Blink camera is turned off. This is crucial to avoid any accidental damage to the camera’s delicate electrical components.
Unscrewing the Security Camera from the Mount
The process of unscrewing the security device from the mount is usually quite straightforward. It mostly depends on the type of mounting solution used. For instance, if it is attached using a screw-in base, gently unscrew the Blink cam from the mount until it’s loose enough to be separated. Remember to keep the screws in a safe place for future use.
Note: The method used to detach the surveillance equipment may vary depending on the model or your specific mounting configuration.
Additional Safety Precautions
When separating your Blink camera from its bracket, deliberately adopting a slow and steady approach is advisable. This is to prevent dislodging parts and components that could affect the eventual reinstallation process.
- Ensure the device is handled gently to prevent mechanical shocks that could disrupt its internal components.
- Do well to avoid touching or applying pressure to the camera lens as it could be highly sensitive.
- Make sure to detach the cam under suitable lighting conditions to ensure no parts are lost or overlooked.
In summary, the process of detaching a Blink camera from its mount should be done with utmost caution to maintain the integrity and functionality of both the camera and mount.
Step Five: Ensuring Proper Storage of Your Detached Blink Camera
Once you have successfully detached the Blink camera from its mount, it’s imperative that the camera is stored safely to prevent any damage. This section presents a comprehensive guide on how to effectively store your Blink camera post removal.
Essentials for Proper Blink Camera Storage:
- Always store the camera in a dry and cool place. Exposure to dampness or extreme temperatures can cause irreparable damage to the device.
- If you’re planning to keep it unused for a long time, ensure to remove the batteries to avoid possible leakage issues.
- Avoid locations with high amounts of dust and dirt, as these can interfere with the camera’s components and affect its functionality.
- Never place the camera near magnetic or electronic devices, these can disrupt the performance of your Blink camera.
On top of these, it would be beneficial investing on a protective case or camera bag for an added layer of security for your device. A case not only shields your camera from dust and scratches but also makes it easier to carry and transport said device to different locations.
Storing the Mount:
Besides the camera, the camera mount should also be stored properly. Keep it in a safe place where it is not likely to get bent or scratched. Furthermore, it’s crucial to keep the mount separate from the camera to avoid any potential damage to either component.
Above all, proper storage guarantees not only the longevity of your Blink camera and its accessories but also their optimal working condition whenever you need to use them in the future.
Key Steps to Follow When Resetting Your Blink Camera onto a New Bracket
Moving your Blink camera from one location to another and placing it on a different mount may seem like a daunting task. However, it can be a pretty simple process if you follow certain tips and precautions.
Preparations For The New Mount
Before you even think about detaching your Blink camera from its current position, make sure you’ve already prepared its new home. See if your chosen location provides a clear, unhindered view of the area you want to monitor. Consider the height and angle, as well.
Once you have found the perfect spot, it’s time to install the new mount. Ensure that the surface is stable and solid – this is crucial for properly securing the mount. Drill the necessary holes, insert wall anchors if needed, and securely mount the bracket. Ultimately, confirm that it remains steady even when some weight is applied to it.
Reinstall Your Blink Camera
It’s time to remove your Blink surveillance device from its existing place. Carefully unscrew it from the current mount, making sure not to drop or damage the camera. Once off, inspect your camera for any signs of damage or wear that may have occurred during the removal process.
After you have ensured that your Blink camera is in good condition, attach it to the newly installed mount. Position the camera to your desired angle and tighten the screws. Check if the camera is secure and won’t easily be knocked off or adjusted.
Test Your Camera
Finally, don’t forget to test your camera. Open the Blink app on your smartphone and check if the camera is working as it should. Adjust the view via the app if necessary, and check if it captures the intended area properly. With this final step, your Blink security camera’s move to a new location should be successful.
FAQ: How to remove blink camera from mount
What is the first step of reinstalling the Blink Camera on a different mount?
The first step is to uninstall the camera from its current location. Ensure that the system is disconnected from the main power to avoid any electrical mishaps.
Should I reset the Blink Camera before reinstalling on a different mount?
No, it’s not necessary. However, if you’re experiencing issues with the camera, a reset may be helpful.
How do I secure the Blink Camera to a different mount?
After you choose the new location, you should use the screws provided with the mount to secure the camera. Ensure that you do not overtighten the screws as this might damage the screw hole.
Can I use a different mount than the one provided with the Blink Camera?
Yes, many third-party mounts are compatible with the Blink Camera. However, ensure you choose a sturdy and reliable model for best results.
Do I need to reconfigure the Blink Camera after the reinstallation is complete?
No, all your previous settings should be intact, including configurations like sensitivity, retrigger time, clip length, etc. If you encounter any issues, you may have to reset the configuration.
What should I do if the camera does not work after reinstalling it on a different mount?
If you run into such an issue, first check to make sure that the camera is properly secured on the new mount and the power connection is well established. If the problem persists, reset the camera and reconfigure the settings.
Do I need to take any special precautions while reinstalling the Blink Camera?
While reinstalling the camera, it’s important to ensure the lens doesn’t get scratched. Also, avoid touching the lens with bare hands as it may leave smudges which could affect the picture quality.