Having a Blink Camera can provide an added layer of security for your home or business. However, there may be situations where you want to share access to your camera with family members, friends, or colleagues. Perhaps you are away on vacation, or you require assistance to keep an eye on your business premises. This can often seem complex, especially for non-tech-savvy individuals.
In this article, we aim to simplify the process for you, offering a clear, stepwise guide on how you can let others view your Blink Camera feed securely. We will walk through the procedure, screenshot by screenshot, making it as easy to follow as possible.
Blink Camera, a smart, convenient, and effective security solution, allows multiple users to monitor its feed remotely. But to do that, access permissions need to be properly managed to maintain security. Our objective is to provide you with a comprehensive tutorial on granting controlled access to your Blink Camera.
Diving into the world of Blink Home Surveillance
The innovative blink home surveillance system is engineered to provide not only protection but peace of mind that your home is always secure. This system is often mentioned when discussing sharing camera access methods, illustrating its integrate-ability and user-friendly nature.
What is the Blink Home Surveillance System?
This is a top-tier, wireless home security and video monitoring system designed for the modern, connected homeowner. It offers a suite of features such as motion-activated alerts, live-streaming video and a powerful alarm system, all controllable straight from your mobile device. This flexibility allows homeowners to easily control and manage their home’s security no matter where they are.
Blink home surveillance system cameras are simply activated using their respective app and connect directly to a home’s wifi network. This allows for real-time, 24/7 monitoring of your home through the convenience and accessibility of a smartphone or tablet. The cameras’ wireless design provides easy setup options without the need for professional installation, making it a cost-effective choice for most homeowners.
- Real-time Alerts: The system is equipped to send alerts instantly when it detects any activity. It keeps users informed so they can take necessary actions.
- Live-View mode: This feature allows for real-time streaming through the use of smartphone apps. It delivers a live video feed of the house directly to a user’s device.
- Remote access: This advantage comes into play when looking to share access to the camera feeds. The control apps grant secure access and permission to others, allowing them to monitor via their devices as well.
- Voice Activation: With its compatibility with Alexa-enabled devices, it supports voice commands to control your home’s safety.
The Blink Home Surveillance system is a standout for its innovative features, easy installation, and usage. It provides homeowners with a reliable way to ensure house safety while enjoying the flexibility of remote monitoring and sharing of access rights.
The Advantages of Allowing Access to Your Blink Security Camera
Allocating access to your home security system’s Blink cameras can offer several perks. By doing so, you can ensure better safety and convenience for you and other users. It also enhances the overall effectiveness of your home security system. For multi-member households or workplaces, it becomes particularly advantageous.
Improved Security and Monitoring
By providing Blink camera access to other users in your household or office space, you can bolster your security system. When several people can monitor and receive alerts from the camera system, the chances of missing any strange or suspicious activity are lessened. For instance, it can be helpful during trip situations where additional eyes could provide real-time security to your property.
Better Convenience and Accessibility
Another benefit that can’t be overlooked is the substantial increase in convenience and accessibility that it offers. It eliminates the need for a single person to be constantly vigilant about the surveillance feed. It becomes a collective responsibility, and hence, less taxing. This sharing capability helps ensure that someone can always respond quickly to unexpected events, even if another person missed them.
Enhanced Flexibility
Finally, sharing your Blink camera access can lead to more flexible monitoring. It allows different users to focus on specific areas or times, based on their convenience. It becomes simpler to manage and delegate surveillance responsibilities, which significantly enhances the utility of your security system.
In conclusion, offering access to your Blink camera system greatly enhances security, convenience, and flexibility. So, whether it’s for your home or business, it’s an option worth considering to make the most of your security system.
Initiating the Process: Making Your Blink Camera Ready for Access Sharing
Setting up your Blink camera for sharing access is an easy task when approached systematically. This process enables you to grant viewing capabilities to other people, maintaining your video security priorities without compromising your privacy. Let’s prepare to take the necessary steps to facilitate this operation.
Considerations Before You Begin
Before you begin, it is essential to have complete knowledge of the device’s pros and cons of sharing access. For instance, shared users can view live streams, receive motion alerts, and control the activity zones; nonetheless, they cannot delete or share videos or change camera settings.
Also, ensure that the people with whom you share access have the Blink Home Monitor App installed on their smartphones. The application can be downloaded from the Google Play Store for Android devices and the Apple App Store for iOS devices. Finally, you need the username (email id) of the person with whom you want to share camera access.
Ensure Your Camera Is Ready
- Make sure that your Blink camera is properly installed and working. This includes properly positioning it and ensuring it has an active internet connection.
- Update your Blink Camera to the latest firmware version to avoid any compatibility issues.
- Verify that you can access your Blink camera correctly via the Blink Home Monitor App.
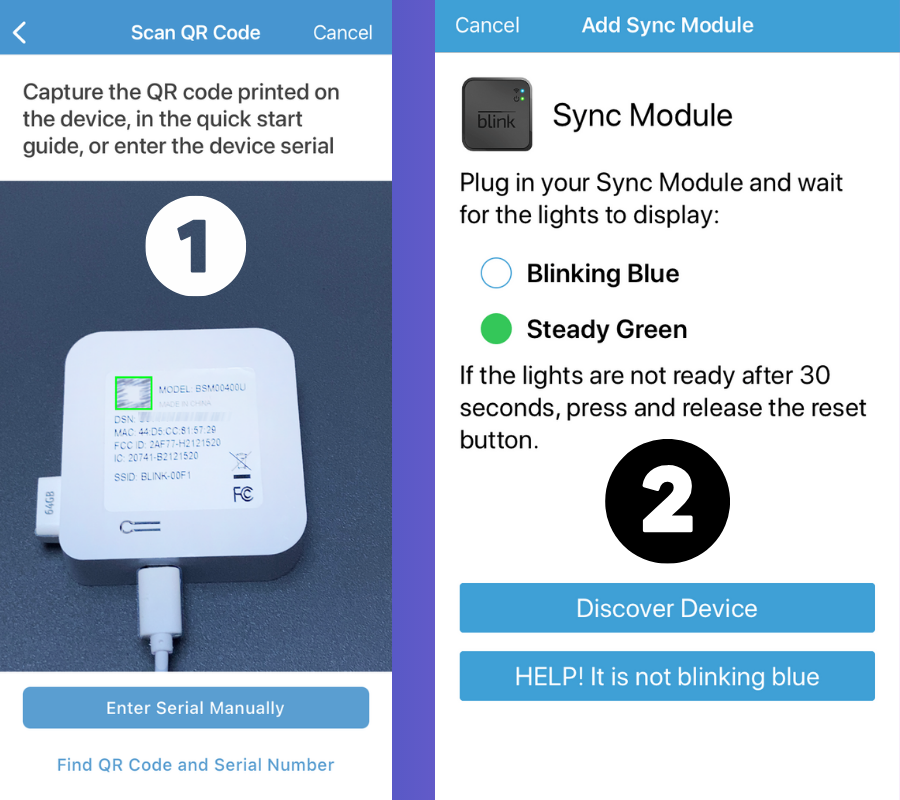
- Ensure that the sync module is correctly connected to your camera. The sync module connects to your home’s WiFi network and communicates with your Blink cameras. Without it, your camera isn’t able to send any footage to the cloud or receive software updates.
In conclusion, preparing your Blink camera for sharing access is a process that involves considering several factors. Once you are ready, you can then proceed to share camera access to ensure continuous security monitoring.
First Step: Guiding You Through the Blink Camera Setting
The first step towards sharing Blink Security Camera access revolves around reaching the camera settings. It’s instrumental in giving other people permission to view your device’s live feed, so let’s dive into the details.
On Your Smartphone
- Begin by unlocking your smartphone and find the Blink app icon on your device’s screen. Tap the application to open it.
- Locate the Blink Wireless Camera option in the list of systems. Tap on it to open the settings for this specific camera.
Remember, if you have multiple Blink devices added to your account, you will need to perform these steps individually for each camera you intend to share access with.
On Desktop PC
For those more comfortable with a traditional desktop interface, accessing the Blink Camera settings is just as straightforward.
- Open your preferred internet browser and type in the web address for the Blink Home Monitor website.
- Once there, log into your Blink account, navigate to the system settings by clicking the appropriate icon or menu item, and select Manage Devices.
- Finally, select the camera whose settings you want to access.
There, you’ve now accessed your camera’s settings, preparing you for the next steps of this guide, which involves the actual process of sharing your Blink Camera access with your chosen recipients. We’ll walk you through each of those steps to ensure you’re not left struggling.
Stage Two: Launching the Process of Sharing Your Blink Camera’s Access
After setting up your Blink camera, it is now time to move on to the next step which involves fostering collaboration and shared access. Remember, when executed properly, sharing your Blink camera access can significantly enhance your home’s security. This will allow trusted individuals to monitor your home and alert the authorities in case of any inappropriate activities.
First, go to your Blink app home screen. Ensure that you have installed the latest version of the app. Newer versions of the app have better performance and more enhanced security features. If you haven’t updated the app in a while, visit your device’s app store to update it.
Then, look for the Manage Account option in the menu. Clicking on this option will open a dropdown list. From this list, choose Manage shared users. This will open a new page where you can add new users by inputting their email address.
- Input the recipient’s email address in the box provided, then touch the Add button. However, keep in mind that the individual you’re sharing with should also have a Blink account linked to that email address.
- Once you’ve clicked the Add button, the system will send an invitation to the email address. The recipient will have to accept the invitation on their end to gain access.
- Finally, choose the Blink camera system that you want to share with the user and confirm the action.
In conclusion, starting the sharing process for your Blink camera is a straightforward task that can be accomplished with just a few taps on your screen. The process outlined above is easy to follow even for those who aren’t tech-savvy. So, go ahead and grant your trusted friends and family access to help you keep an eye on your property.
Please, remember to review the user permissions regularly and revoke access when necessary to ensure your home’s security remains uncompromised.
Implementing Step Three: Incorporating a New Member into Your Blink Application
Process of Inviting a New Member
Once you have installed your Blink camera system and created your account, you may want to permit other users to view the camera feed. Whether it’s your spouse, family members, or co-workers, you can easily provide them with access. The third stage in sharing Blink camera access entails integrating a new user into your Blink system.
In order to include a new user to your Blink account, start by tapping the Manage Account option in the settings menu of your Blink application. The Manage Account option allows you to have the ability to insert or remove users from your account.
To proceed with the addition of a new user, click the Add button which is located in the Users tab. On doing this, a space will show up that allow you to fill the email address of the person that you would like to invite to your Blink camera account.
Steps to Follow
- Navigate to the Manage Account section from the settings menu of the Blink application.
- Click on the Users tab.
- Press the Add button to bring up the invitation area.
- Type in the email address of the new user and click on the Send Invite button.
Points to Remember
- You can only invite new users who have a valid email address.
- The new user will receive an invite that they need to accept to get access.
- You can remove users at any time by following a similar process.
In conclusion, inviting new users to your Blink Camera account is a straightforward process. Stay tuned for the next steps to further utilize your Blink Camera System.
Phase 4: Delegating Roles to the Newly Added User
Once the user’s email address is added successfully, the next crucial step is to delegate roles or grant access rights to that specific user. This process allows the new user to view or control your Blink camera system based on the permissions provided.
Follow these easy steps:
- After adding the recipient’s email, you will see a selection box or list of permissions that can be assigned. This list includes several roles that have different access levels. Depending on the model of your Blink Camera, these roles can range from simple viewing of live feeds to controlling the camera settings.
- Select the permissions or roles you wish to give to the new user. Once you’ve done this, the new user will only have the abilities that match the permissions ticked. Make sure to carefully assign these roles as inappropriate access levels can lead to security concerns.
- Once you’ve selected all the permissions, confirm or click on the ‘Save’ button. This action will finalize the permissions you’ve set for the new user.
Remember, the permissions can be changed or updated at any time if the need arises. Simply repeat the same process and select or deselect the roles accordingly.
In conclusion, assigning of permissions acts as a security gatekeeper, ensuring that the delegated user has the right level of access, no more and no less. This setup will provide you with peace of mind, knowing that your security system is not compromised, while allowing others to assist in maintaining and monitoring your Blink camera system.
Last Steps to Complete the Process of Sharing Your Blink Camera Access
The final steps in the process of sharing your Blink Camera access are straightforward and simple. However, you must ensure you follow these steps correctly to avoid any potential issues or breaches in security. Following these steps should enable your chosen person to access the view from your camera.
Step 5: Confirming and Completing Sharing
Your next task is to verify that you’ve chosen the correct individual to share access with. You’ll be shown the person’s name or email address, ensure you recheck all the details. If all the information is correct and you’re certain you want to proceed, you can then confirm to finalize the sharing process.
Additionally, you need to ensure the person receiving access is prepared. They should have the Blink app installed on their mobile device, and create an account if they don’t already have one. Once they accept your request, the Blink Home Monitor system will send an invitation asking for confirmation of access acceptance. This is crucial for their ability to view the camera footage.
- Confirm the details of the person you wish to share access with, check twice to ensure the individual is correct. Press confirm to complete the process.
- Make sure the individual receiving the access has the Blink app installed and has an account set up.
- The Blink system will send an invitation that they must accept in order to view the camera’s footage. Ensure they do this immediately to avoid any complications.
Remember, sharing access to your Blink camera is a significant step. You have to ensure that the person you’re giving access to can be trusted. If you ever need to revoke their access, you can manage this through the app’s settings.
With these final steps, the scene is set for successful Blink Camera access sharing.
Resolving Frequent Hurdles in Providing Access to a Blink Security Camera
When you’re having issues sharing your Blink security camera access with other users, don’t stress. There are several common issues that you may face in the process, but luckily, most of them have straightforward solutions. This guide will help you troubleshoot some of these issues and ensure smooth use of your Blink camera.
Problem 1: Incorrect Login Credentials
Misentering the email address or password is a common mistake users make when trying to provide access to someone else. Ensure that the password and email are entered correctly. Remember that passwords are case sensitive. Double-check every detail before proceeding.
Problem 2: Insufficient Permissions
Ensure the new user has been granted the correct permissions. For instance, if the user should be able to see live videos, make sure that feature is enabled for that user. Visit the Blink camera app settings and check the user permissions configuration.
Problem 3: Outdated Application Version
Another potential issue could be using an outdated version of the Blink Camera App. Updates frequently include bug fixes and enhancements that could solve your problems with granting access. Make sure both you and the recipient have the latest version of the app installed.
Problem 4: Network Issues
If the user you’ve provided camera access to is encountering a slow or continuously buffering stream, it might be due to poor internet connectivity. Advise them to check their network connection and, if possible, to switch to a more stable one.
While these are some of the common issues encountered when sharing access to a Blink camera, if your problem persists, don’t hesitate to contact the Blink Support Team for further assistance. Troubleshooting doesn’t always resolve every problem, but it’s a reliable first step to rectify common issues.
Further Suggestions to Enhance the Procedure of Sharing Access to Your Blink Security Cam
Getting the most from your Blink security camera includes understanding how to efficiently share access. Here are a few additional recommendations that can help optimize the process.
Use a Strong Password
While sharing access to your Blink cam, it’s crucial to apply a strong password. This ensures your camera feed remains protected from unauthorized users. Passwords should be unique, combining numbers, symbols, and both upper and lower case letters. Change your passwords regularly for optimal security.
Set Up Activity Zones
You can set up activity zones on your Blink camera to control where exactly motion is detected. If you’re sharing access, you might want to confine notifications to specific areas to avoid unnecessary alerts.
Advise on Proper Usage
When extending accessibility to your Blink camera with others, it’s essential to communicate detailed instructions on suitable usage. This can help prevent accidental adjustments to essential settings.
Use Shared Links
Using shared links can simplify the process of extending Blink security camera access. Generate a secure link through the Blink app and provide it to the user. This method helps avoid transmitting confidential login details.
Revoke Access When Necessary
Remember, you can revoke access whenever necessary. If you’ve previously shared your camera access with someone who no longer needs it, it’s a good practice to revoke these privileges to maintain security control.
Optimizing the process of sharing your Blink security camera access could significantly enhance its functionality and overall security. Implementing these strategies can offer a smoother user experience for both yourself and the individuals with whom you’ve shared access.
Complete Guide: How to Withdraw Access from a Blink Camera
Allowing someone to use your Blink surveillance system is quite straightforward, but there can be instances when you need to withdraw that access. This article provides an in-depth guide on how to go about it.
Steps to Withdraw Access from Blink Cameras
To successfully withdraw Blink surveillance system access, it’s critical to follow the below steps:
- Start by opening the Blink Home Monitor app on your smartphone.
- Go to the home screen and tap on the ‘Manage Account’ button located at the bottom of the screen.
- Next, access the ‘Manage Users’ option
- Locate the user whose access you wish to withdraw and tap on their email address.
- You’ll then see the ‘Remove Access’ option. Click on that, and the user’s access will be immediately revoked.
That’s it – the individual will no longer be able to access your Blink surveillance cameras. It is important to remember that withdrawing someone’s access could indicate to them that you’ve turned off their authorization. Therefore, it’s essential to discuss this matter with the person involved before proceeding.
Additional notes
Here are a few additional things to consider:
- Only the account owner has the authority to grant or withdraw access from other users.
- Removed users can regain access to your Blink system only if you choose to provide it again. To do that, you’ll need to invite the person once more to your Blink Home Camera network.
- Furthermore, while a user can view camera feeds and control video settings, they can’t alter account settings or add/delete cameras.
- Removed users will not be able to see any saved footage, nor receive any alerts or updates related to the Blink system.
In conclusion, Blink’s user management system is designed to keep your home safe and secure, letting you decide who has access to your camera feeds. Always remember, it’s important to control and monitor who has access to your home security system. Don’t forget to regularly review your user list, and ensure that only trusted individuals have access to your Blink cameras.
FAQ: How to share blink camera access
How do I revoke Blink camera access from someone?
You can revoke access by going to the Blink App, then navigate to the settings of the specific camera. Choose ‘Manage Account Information’, and then select the user you want to revoke access from. Click on ‘Remove Access’.
Why would I need to revoke my Blink camera access?
You may wish to revoke access if you no longer want someone to be able to see your camera footage. This could be due to a variety of reasons such as ending a lease, termination of a contract or if you suspect someone is misusing their access rights.
Can I revoke Blink camera access temporarily and then grant it back?
Yes, you can revoke access temporarily and then grant it back whenever you wish. Just follow the same steps for granting access again through the Blink App.
What happens when I revoke access to my Blink camera?
When you revoke access, the person will no longer be able to view the camera’s live feed or any stored footage. They will also lose the ability to change any settings or controls related to the camera.
Can the person know when I have revoked their Blink camera access?
No, the person will not be notified when you revoke their access. However, they will realize it once they fail to access the camera feed or settings.
Can I revoke Blink camera access from all users at once?
No, Blink system doesn’t currently support bulk revoking. You will need to manually revoke them for each individual user.
Will revoking access affect my Blink camera’s normal functions?
No, revoking access from a user will not affect the normal operations of your Blink camera. You will still be able to use the camera as usual, and other users with access will remain unaffected.