Setting up a home security system can be a daunting task, especially when it involves the process of connecting cameras to a WiFi network. However, it becomes significantly easier with our handy, step-by-step guide, specifically tailored for users of Wyze cameras. Wyze cameras are renowned for their top-tier security features, high resolution, and, above all, user-friendly setup process – the perfect starting point for beginners venturing into the world of home security.
Still, despite the ease of use, the process might seem complicated for some users. That’s why we’ve designed this comprehensive guide to facilitate the connection of your Wyze Camera to a wireless network. We will clarify every step, ensuring your camera setup experience is smooth and hassle-free.
From unboxing your new camera to watching live footage on your device, this absolute guide will help you navigate the process. By the end of this guide, you will confidently connect your Wyze Camera to your WiFi network. So, let’s take the first step towards enhanced home security together.
Grasping the Fundamentals of the Wyze Camera and Its Interactions with WiFi
The Wyze camera, known for its quality and affordability, is a smart device designed to elevate your home’s security. The camera’s potential can be fully realized when connected to a WiFi network, enabling features like live streaming, motion detection, and cloud storage.
Understanding the connection between your Wyze Camera and WiFi is key to making the most of its features. When successfully connected, the devices can interact seamlessly, offering you a real-time view of your monitored surroundings, timely alerts, and the ability to review footage from almost anywhere.
Steps for Configuring Wyze Camera’s WiFi Connectivity
Setting up the WiFi link with your camera is a straightforward process that involves these general steps:
- First, ensure that your Wyze Camera is powered up and your WiFi network is active and secure.
- Next, download and install the Wyze app on your smartphone. Create an account if you don’t already have one and log in.
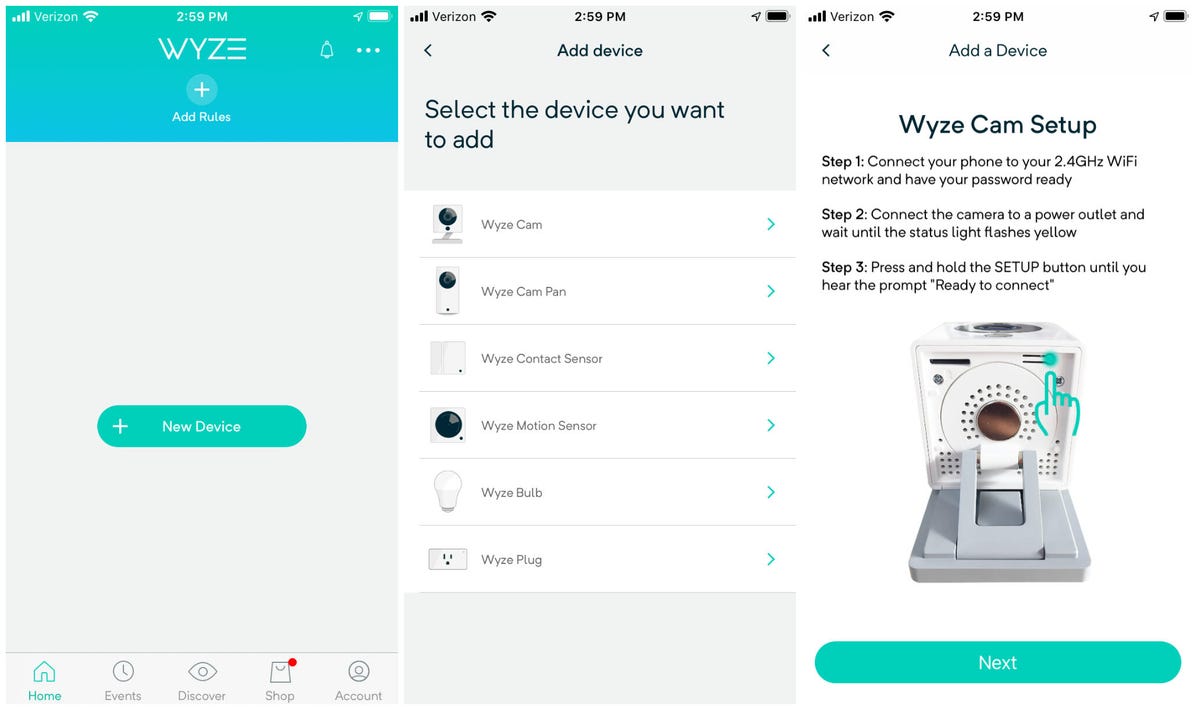
- On the app’s home screen, click the ‘+’, select ‘Add a Product’. Choose ‘Wyze Cam’ and follow the instructions to complete the setup.
Remember: During the setup process, you’ll need to share your WiFi credentials (network and password) with the Wyze app. It is critical to ensure your WiFi network is password-protected and the connection in use is the one intended for the Wyze camera.
In conclusion, after you complete the initial setup, you should be able to recieve live feed, get notifications, and enjoy other functionalities the Wyze camera has to offer. All made possible by establishing a stable WiFi connection.
What’s more, is that understanding how your Wyze camera connects with WiFi not only allows for smoother setup but also a better utilization of the camera’s features.
Getting Ready: Ensuring Your WiFi and Wyze Camera are Compatible
Before you can connect your Wyze camera to your home’s wireless network, you need to confirm that your devices can work together. The first step is understanding the WiFi and camera’s compatibility. We’ve compiled a step-by-step guide to prepare you to connect your Wyze camera to WiFi successfully.
Matching Your Wyze Camera with Your WiFi Network
Ensure that your Wyze camera and your WiFi router can communicate. Wyze cameras are designed to work with WiFi networks on the 2.4GHz frequency band. Unfortunately, they are currently not compatible with 5GHz networks. If your WiFi operates on a 5GHz band, you may need to enable the 2.4GHz band or get a dual-band router.
Verifying Your Wyze Camera
- For Wyze Cam v1: The setup button is located on the bottom of the device, and the status light is on the back.
- For Wyze Cam v2 and Wyze Cam Pan: The setup button and status light are both on the bottom of the device.
We recommend ensuring your Wyze camera is fully charged or connected to power before starting the setup process. An unexpected loss of power during setup can lead to setup issues.
Preparing Your Mobile Device and Wyze App
You will also need a smartphone or tablet with the Wyze app installed. The device should be connected to the 2.4GHz band of your WiFi network. Ensure there’s no obstruction or significant distance between your WiFi router and Wyze camera during the setup process. You can set up your Wyze camera using the Wyze mobile app that is available both on iOS and Android platforms.
What You Will Need to Set Up Your Wyze Camera with Wi-Fi
Setting up your Wyze cam for wireless networking requires specific equipment. First and foremost, you will need your Wyze security camera. This can be any model of Wyze cam as all of them are equipped with wireless capabilities.
Secondly, you will need a stable internet connection with Wi-Fi. The important point here is the strength of your Wi-Fi connection. If the Wi-Fi signal appears weak where you plan to install your camera, you may want to consider getting a Wi-Fi extender to boost the signal. Remember, a strong and stable Wi-Fi connection is vital to keep your Wyze camera running smoothly.
Additionally, you will need a smartphone with the Wyze app installed. The Wyze app is used to complete the initial setup of the camera and connect it to your Wi-Fi network. It is available for download in both the Apple App Store for iOS devices and Google Play Store for Android devices.
Lastly, you will need the power cord that came with your camera to keep it powered. If you lost it, any standard micro USB cable coupled with a power adapter will work. If your camera model is battery-powered, ensure the battery is fully charged before setup.
Summary of The Necessary Equipment:
- Your Wyze security camera
- A stable internet connection with Wi-Fi
- Smartphone with the Wyze app installed
- Power cord or fully charged battery for the camera
Note: If you plan to install your Wyze camera outside, consider getting a weather resistant case to protect it from the elements. While some models of the Wyze cam are designed to be weather resistant, not all of them are, and it’s better to be safe than sorry!
Initial Steps: Unpacking and Starting Your Wyze Surveillance System
Embarking on the journey to set up and connect your Wyze Surveillance camera to WiFi? The initial step in this process involves carefully unboxing and powering up your gadget. These preliminary steps are crucial to ensure the successful operation of your camera system.
Unboxing Your Wyze Security Camera
Upon receiving your new Wyze security camera, your initial step is to carefully unpack it from its box. Be gentle as unnecessary pressure or mishandling may damage the device. The package usually includes the Wyze camera, a power adapter, a long USB cable, a metal plate with an adhesive, and a quick start manual. Locate every item to ensure none is missing.
Powering Up Your Wyze Camera
Now, once you’ve identified all components, proceed to powering up your device. Start with plugging the USB cable into the power adapter. Next, insert the small end of the USB cable into the port at the back of your Wyze camera. Consequently, attach the power adapter to a power outlet. As you do this, observe the status light positioned at the back of the device. It should flash a solid yellow which indicates that the camera is powered up and ready for the next steps.
Note: It is important to position the camera close to the Wi-Fi router for the initial setup to enhance signal strength and avoid connection issues. Once the setup is complete, you can move it to your preferred location.
Second Step: Setting Up the Wyze Application on Your Mobile Device
Once you have the Wyze cam at your disposal, the second step to connect it to WiFi involves downloading and installing the Wyze application on your mobile device. This step is critical as the application serves as the control hub for your Wyze camera, allowing you to view footage, change settings, and connect the device to your WiFi network. The following paragraphs provide a detailed walkthrough for setting up the application
Downloading the Wyze App
Navigate to the app store on your smartphone or tablet. For Android devices, this will typically be the Google Play Store, while iOS users will find the application on the Apple App Store. Within the app store, use the search bar to locate the Wyze application. Click on the application’s icon and hit the install or get button to start the download process.
Installing and Setting Up the Wyze App
Once the download is complete, the application will automatically install on your device. Following its successful installation, open the Wyze app. You will need to sign in if you have an existing Wyze account or create a new account if you’re a first-time user. Registration is relatively straight forward – provide a valid email address, create a secure password, and follow the prompts to complete the sign-up process.
- Important Note: Keep your login details safe as you’ll regularly need them to access your Wyze app.
As soon as you have successfully set up your account, you’ll gain access to the app’s main interface. Here, you can proceed to the next step, which involves adding your Wyze cam to the app to facilitate its connection to your WiFi.
Next Phase: Adjusting the Wyze Camera’s Network Settings Through its App
In the next phase, you need to fine-tune the WiFi settings of your Wyze camera using its dedicated application. The following instructions will enable you to modify the settings comfortably and efficiently.
Adjusting Network Preferences
Firstly, launch the Wyze app and tap on your device from the Home page. From there, select the Settings option that appears on the top right corner of the screen. It will redirect you to the device settings page.
Now, navigate towards the Device Info option to check the current Network Information. In order to connect your Wyze camera to a new WiFi network, tap on Swap Network and enter the details of the desired network. Be sure to input the correct WiFi name (SSID) and password, as these details are case-sensitive.
You will find a Save option below the inputs, tap on it in order for the device to remember the new WiFi settings. If your device successfully connects to the WiFi network, it will confirm with the message Connection Successful.
If you encounter any connection issues, you can tap on the Try Again button and repeat the above procedure. Keep these details secure as they might be required in the future for any network troubleshooting.
Important Note:Your Wyze camera only supports 2.4GHz WiFi networks, so ensure your router is set correctly before proceeding with the WiFi setup.
WiFi Settings Customization
Besides the basic network setup, the Wyze app offers several customization options for your camera’s WiFi settings. For instance:
- You can regulate the camera’s uploading speed and video quality based on the strength and speed of your WiFi connection.
- The Motion Tagging feature allows the camera to highlight any movements detected within its visual range, which ties directly to the stability of the WiFi connection.
In conclusion, the Wyze app not only enables setup of your camera’s WiFi settings but also equips you with various options to tailor them to your specific needs.
Step Four: Verifying the Connection of Your Wyze Cam to your Wireless Network
After accomplishing the previous steps to connect your Wyze camera to your WiFi, it is essential to ensure that the connection has been established successfully. This stage involves testing the integrity of your Wyze camera’s connection to the wireless network.
Scheduled Verification of Wyze Cam’s Wireless Connection
Begin by planning a regular schedule to check whether your Wyze camera is consistently holding its WiFi connection. This will help identify any problems that may arise due to unstable connections, ensuring that your camera maintains optimal performance for security purposes. The frequency of the checkups can be daily, weekly or monthly, depending on your preferences and requirements.
Examining the Video Feed from the Wyze Cam
Another way to confirm if your Wyze camera’s WiFi connection is working correctly is by testing the video feed on the Wyze application. This is a live reflection of the camera’s view, and if it updates continuously, then it means the camera is correctly connected to your WiFi network.
- Image Quality: Check whether the video quality is clear and not pixelated. A poor image quality may be a sign of a weak WiFi signal.
- Video Lag: Measure the time delay between the real-time event and the display on your device, commonly known as the video lag. A significant lag could indicate an inadequate WiFi connection.
Remember, a stable and robust WiFi connection is the backbone of your Wyze camera’s performance. Always ensure that your device is adequately connected to enjoy uninterrupted security monitoring services.
Resolving Typical Problems When Linking Your Wyze Cam to a Wireless Network
While setting up your Wyze Cam to operate on your wireless network, you might encounter some connectivity issues. These can typically be resolved by following a few troubleshooting steps.
Power and Connectivity Issues
If your Wyze Cam is not turning on or not connecting to WiFi, confirm if the power cable is properly connected and that your WiFi network is functioning correctly. Also, ensure the camera is within the range of your WiFi signal. Frequent disconnections could be due to an unstable network or signal interference. Try to place the camera closer to your router or use a WiFi range extender.
Incorrect WiFi Credentials
Always double-check your WiFi credentials before trying to connect your camera. Include the correct network name (SSID) and the password. Remember that these entries are case sensitive. If you’ve changed your WiFi password recently, you’ll have to update this information in your Wyze Cam settings as well.
Camera Firmware Issues
Make sure your Wyze Cam’s firmware is up to date. Sometimes, an outdated version may cause connectivity problems or prevent your camera from functioning optimally. Regularly updating the firmware enhances the performance of your camera and adds new features.
Router Compatibility
Some users may experience connectivity issues due to incompatibility with their routers. If your Wyze Cam does not connect, verify that your router is broadcasting in a compatible mode. The Wyze Cam is designed to work with 2.4 GHz networks, not the 5GHz. So, setting your router to broadcast specifically on 2.4GHz, could resolve the issue.
Troubleshooting these typical problems should enhance your Wyze Cam’s WiFi connectivity. If your camera still fails to connect or frequently loses its connection, you might want to reach out to Wyze support for further assistance.
Leveraging Your Wyze Camera’s Functions through Enhanced WiFi Connectivity
Utilizing enhanced Wi-Fi connectivity enables you to make the most out of Wyze Camera’s cutting-edge features. Without a stable internet connection, you may not fully enjoy high-definition, real-time video streaming, smart alerts, or cloud storage options.
Benefits of Ensuring Optimized WiFi for Your Wyze Camera
Ensuring optimal connectivity can enhance the functionality of your Wyze camera in the following ways:
- Better Video Quality: An optimized Wi-Fi connection guarantees high-quality, real-time streaming and playback without any lags or interruptions. It allows your device to deliver crystal clear images, even in night mode.
- Reliable Smart Alerts: A sturdy internet connection helps prevent delays in smart alert notifications, ensuring that you are promptly informed about any unusual activity.
- Effortless Remote Access: You can remotely access the live feed, review past footage, and adjust camera settings if the camera maintain a stable Wi-Fi connection.
- Secure Cloud Storage: Stable Wi-Fi is necessary for smooth and continued uploading of footage to Wyze’s cloud storage. This ensures that all your video clips are securely stored and easily accessible.
Furthermore, an efficient Wi-Fi connectivity reduces the chances of camera downtime, maintains the longevity of the device, reduces latency issues, and ensures that updates get installed without any hitches. Therefore, spending some time to optimally set up your camera’s connectivity can lead to a seamless and worry-free experience.
To fully experience your Wyze Camera’s powerful features, it is necessary to understand and establish a stable Wi-Fi connection during the installation process. This way, you can ensure that you are making the most of your surveillance system, providing the needed security for your home or business.
FAQ: How to connect wyze camera to wifi
What role does WiFi connectivity play in optimizing the features of my Wyze Camera?
WiFi connectivity is crucial to unlock the full range of features your Wyze Camera has to offer. A steady and robust WiFi connection allows for smoother live streaming, more reliable push notifications, and faster firmware updates.
What can I do to improve the WiFi connection of my Wyze Camera?
To improve your WiFi connection, ensure that your Wyze camera is within a good range of the router. Avoid placing the camera near devices or materials that may interfere with the WiFi signal. Also, consider using a WiFi extender if necessary.
Is there a specific WiFi speed requirement for Wyze Cameras?
Yes, Wyze Cameras require a minimum upload speed of 1.0 Mbps, but 2.0 Mbps is recommended for optimal performance. If you’re experiencing problems, it would be a good idea to check your internet speed to ensure it meets the requirements.
Can I connect my Wyze Camera to a 5GHz WiFi network?
No, Wyze Cameras only support 2.4GHz WiFi networks. You need to ensure that your router supports this frequency and it is enabled.
What happens if my Wyze Camera loses WiFi connection?
If your Wyze Camera loses its WiFi connection, it will automatically try to reconnect. However, during this period, you might not be able to access live streaming or get push notifications. Regular functionality resumes once the connection is re-established.
If I have multiple Wyze Cameras, do they all need to be connected to the same WiFi network?
Each Wyze Camera can be connected to a different WiFi network as long as it has adequate access to the internet. This allows for flexibility in large homes or offices with multiple networks.
Why is my Wyze Camera’s video quality poor despite a good WiFi connection?
Remember that other factors can affect video quality, including lighting conditions, camera placement, and whether the lens is clean or not. However, if the WiFi connection and these factors are fine, consider updating your camera’s firmware to the latest version. An outdated firmware may cause video quality problems.