Setting up your newly-acquired camera and integrating it with your Wi-Fi network not only simplifies your life but also maximizes the camera’s potential. This connection allows you to remotely monitor from your smartphone or computer, thereby offering convenience, especially for individuals continuously on-the-go. It’s an integration that breaks down geographic barriers and gives you peace of mind, knowing that you can monitor your surroundings no matter your location.
The following sections contain a meticulously crafted, easy-to-follow guide on how to seamlessly connect your Hubble camera to your Wi-Fi network. This article will offer step-by-step instructions, guiding you through each phase of the process, ensuring a successful link between your surveillance gadget and your Wi-Fi system. So, get your Hubble Camera, and let’s begin this technological journey!
Instructions to Interface Your Hubble Camera to Your Wireless Network from Support Centers
For seamless remote monitoring and enhanced flexibility, it is essential to link your Hubble camera to your Wi-Fi network. Below, we provide an easy guide to do so.
Link Your Hubble Camera to Wireless Network: A Comprehensive Manual
Ensure you have your wireless network password, Hubble camera, and a compatible smartphone handy before you commence. Going through the following steps will help to establish the connection:
- Launch the Hubble app on your smartphone.
- Select Add Camera option from the dashboard.
- Choose your camera model from the provided list.
- Ensure your camera is turned on and within range of your wireless network.
- From the app, pick your Wi-Fi network and input your network’s password.
- Wait as the app establishes a connection between your camera and the Wi-Fi network.
Please keep in mind that the signal strength of your Wi-Fi network needs to be substantial for the Hubble camera to establish and maintain an uninterrupted connection. If you see any Connection Interrupted warnings, restart the procedure or try moving the camera closer to the Wi-Fi router.
In some cases, you may need to reset your camera if it has connected to another network in the past. For this, hold the reset button located at the camera’s rear for about 10 seconds. Then, proceed with the above steps.
Wirelessly connecting your Hubble camera allows you to enjoy remote monitoring capabilities right from the palm of your hand. It is essential in leveraging all the benefits of your Hubble camera.
What are the Advantages Hubble Connected Support?
By creating a seamless convergence between your Hubble Camera and Wi-Fi, you can enjoy an array of benefits which boost both convenience and security. Exploring these advantages can provide a more comprehensive understanding of this integration and its impact on your daily lives.
Unleashing the Power of Remote Access
One of the major advantages of connecting your Hubble Camera to your Wi-Fi network is the ability to monitor your surroundings from virtually anywhere. This becomes possible as the advanced technology allows for real-time streaming directly to your mobile or other Wi-Fi enabled devices. This advantage brings enhanced surveillance, and gives you an access to keep tabs on your premises even when you are not physically present.
Preserving Vital Footage
Most Wi-Fi enabled Hubble Cameras offer cloud storage solutions, where your surveillance footage is securely saved in a virtual space. This virtual storage not only frees up physical space but also protects your data from being lost due to technical glitches or malfunctions, as everything is backed up online.
Quick Response Time
An ignored aspect often is the swift alert system. In case of any unprecedented activities, a Hubble Camera connected to Wi-Fi can send immediate notifications to your device. This prompt alert system ensures that you are immediately aware of anything happening in your vicinity and can act accordingly.
- Cost-Efficient Surveillance: Wi-Fi connected cameras reduce the reliance on physical storage devices, saving cost in the longer run.
- Easy Installation: The process to establish a Wi-Fi connection is relatively simple and reduces the need for cluttered wires and devices.
- Scalability: As your premises expand, you can easily add more cameras to your network without the hassle of complicated wiring.
Appreciating these benefits of a Wi-Fi connected Hubble Camera, it becomes clear that setting up such a system would be a considerable upgrade in safekeeping your premises.
Equipment Required for Establishing a Wi-Fi Connection with Your Hubble Camera
To successfully connect a Hubble Connected camera to your wireless network, you’ll need a few things on hand to ensure a seamless setup process.
Essential Items:
- Internet Access: Having a stable and reliable wireless connection is paramount. Generally, a 2.4GHz network is recommended for optimum performance. Ensure that the Wi-Fi network you intend to use does not have restrictions or firewall settings that could hinder the connection process.
- The Hubble Camera: Without the camera itself, connecting to Wi-Fi becomes pointless. Hence, make sure you have your Hubble Connected camera available. Check if the device’s LED lights are working properly, as this will come in handy during the setup process.
- Compatible Smart Device: Install the Hubble app on a compatible smartphone or tablet. This application is available on both iOS and Android platforms, so ensure your mobile device meets the necessary operating requirements for the software.
- Precise Location: For the successful configuration of the Hubble camera, you need to position it near your Wi-Fi router during the initial setup process. This proximity ensures that the camera successfully connects to your network with little or no signal interference.
With these essential items, you should be equipped for a successful installation and connection of your Hubble camera to your Wi-Fi network. Be sure to consult your camera’s user manual for any additional specific requirements.
Getting your Hubble Camera Prepared for a Wi-Fi Setup
To guarantee a smooth and successful Wi-Fi configuration, it is crucial to ensure that your Hubble Camera is well-prepared for the Wi-Fi linkage. Ensuring the readiness of your device helps to circumvent possible challenges during the installment.
Here’s a step by step guide:
- Ensure that you are using the latest version of the Hubble application. For an immediate update, visit the app store or play store on your smartphone depending on your OS.
- Establish that the camera is well-powered. The Hubble camera should be plugged into a power source using the power adapter provided in the package. Confirm if the LED power light is on.
- Consider the positioning of your Camera. Position your Hubble Camera within the range where your Wi-Fi signal is robust. A weak signal may cause interruptions during the setup process or result in subpar performance of your camera.
- Verify your Wi-Fi details: Ensure that you have the right Wi-Fi credentials for the network you intend to connect your Camera to. You need the correct network name (SSID) and password. The Hubble Camera only supports the 2.4GHz Wi-Fi band, ensure your router supports this and it’s not set to 5GHz only.
- Ensure your smartphone or tablet is on the same Wi-Fi network during the setup. This is necessary because the Hubble application will need to communicate with the camera via Wi-Fi.
Remember: to check and confirm the compatibility of your Hubble Camera with your existing Wi-Fi standards. For instance, if your camera is not compatible with WPA2, you might need to switch your router to a compatible mode.
Initial Procedure: Accessing the Controls of Your Hubble Camera
The first step in connecting your Hubble camera to your Wi-Fi network involves getting into the settings of your camera. To do this, you need to have access to the internet and a device (computer, smartphone, or tablet) that you can use to access the camera’s settings interface.
Start by launching your browser and enter the IP address of the Hubble camera in the address bar. This should open the login page for the device. The default username and password is usually admin for both. Make sure to change these later on to secure your device.
Once logged in, you should be able to see the main dashboard for the camera. Various options should be displayed, like viewing the live feed, changing video settings, setting up motion detection, etc. For our purpose, you need to navigate towards the ‘Wireless Settings’ option. This is found under the Network or Wireless tab, depending on the model of your Hubble camera. Click on that and it should take you to the page where you can configure your Wi-Fi settings.
This is a critical part in this set-up as you are creating the bridge that links your device to the wireless internet connection. Ensure you know your Wi-Fi name (SSID) and password to successfully connect.
Remember: Every step is critical and of importance, so make certain to follow through diligently. Completing this step accurately is fundamental to the successful connectivity of your Hubble Camera to the Wi-Fi network.
Troubleshooting Tips
If you’re unable to login or don’t see the ‘Wireless Settings’ option, try resetting your camera to its factory settings. Remember though, this will erase any previous settings and you will have to reconfigure it from scratch. If you’re still having problems, don’t hesitate to contact Hubble support for further assistance.
Moving Forwards: Locating the Wireless Internet Options on Your Hubble Device
After successfully setting up your Hubble camera physically, your next task would be to sync the device with your home’s wireless network. This process is a breeze and can be completed without any hassle or need for technical expertise. Follow these simple steps below:
Turning the Device On
Start by power on the device. You should ensure that your camera is plugged into a power source and turn on. Most Hubble cameras will automatically go into a ‘ready to connect mode’ indicating that it is all set to be synced with a wireless network.
Navigating to Network Settings
Next, make the journey to the ‘Network Settings’ menu. This can be accomplished through the device’s main menu or the settings function. This menu will allow you to manage your camera’s network connections and adjust settings as necessary. It’s also where you’ll be able to initiate the process of connecting to a new Wi-Fi network.
Choosing the Wi-Fi Option
Choose the Wi-Fi option under the ‘Network Settings’ menu. Under ‘Network Settings’, you will see a list of options relating to network connectivity. Choose the ‘Wi-Fi’ option as this would allow your camera to connect with your home’s wireless network, thus enabling you to access and control it remotely.
- Turn on the device
- Navigate to ‘Network Settings’
- Select ‘Wi-Fi’
Overall, locating the wireless connectivity settings on your Hubble camera is a straightforward task. By following these steps accurately, you’ll be well on your way to having your camera function in sync with your wireless network.
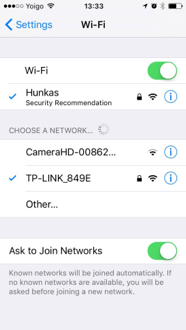
Third Step: Selecting the Appropriate Wi-Fi Connection for Your Camera
In the process of establishing Wi-Fi connectivity for your security device, the selection of the appropriate network for your device is an important step. This selection is essential to ensure the smooth operation of your Hubble security camera.
Turn on Your Camera and Open the Application
Once you’ve made sure that your camera is in close proximity to your Wi-Fi router — within 30 feet is the optimal distance — it’s time to begin the process of selecting the appropriate Wi-Fi network. Ensure that your camera is switched on and then open the Hubble application on your smart device.
Finding Your Network
Under the ‘Camera Settings’ section in the app, you will find the ‘Wireless Setup’. In this section, a list of available networks will be displayed. More often than not, multiple Wi-Fi networks may be shown on this list, especially if you are in a densely populated area.
Choosing the Correct Network
Select the network you wish your Hubble camera to connect with. If you’re uncertain which is your network, look for the network name mentioned on your Wi-Fi router. Be very careful to select the correct network as connecting to an unknown network can compromise your camera’s security.
Inputting Your Wi-Fi Password
Once the correct network is selected, you will be prompted to enter the network’s password. This is usually mentioned on the Wi-Fi router or provided to you by your Internet Service Provider. After entering the correct password, click ‘Save’ or ‘Connect’, the title of the button may vary depending on the device you are using.
Ensuring Successful Connection
After you have entered your password and clicked to proceed, the connection process will take a few moments. Ensure that neither the router nor the camera is turned off during this time. Once the connection is established, a confirmation message will be sent to you via the app.
This is the third step of setting up your Hubble camera for Wi-Fi connectivity. Following these instructions will ensure a secure and uncomplicated setup for your Hubble camera, allowing you to maximise its potential.
Step Four: Inputting Your Wi-Fi Network’s Security Code
After successfully identifying your Wi-Fi network, you will now proceed with the crucial step of keying in the security code for your network. This password is necessary to ensure safe and secure connectivity between your Hubble Camera and the Wi-Fi network.
Note: This password isn’t to be confused with the password for the Hubble camera. It’s the security code that you usually use to connect other devices in your house to the Wi-Fi network.
To get this done, find the empty field on the screen labeled as ‘Password’, ‘Key’, or something similar. As you’ve probably guessed, this is where you’ll enter your Wi-Fi password.
One must be careful while entering the code. Remember that passwords are often case-sensitive and have to be typed exactly as they were set (capital and small letters matter).
Once sure that you’ve input the password correctly, tap the Connect or Save button (the actual label might vary depending upon the device).
After hitting the save/connect button, your Hubble Camera will now attempt to establish a connection with your Wi-Fi network using the details provided. This process may take a few seconds, so be patient and do not interrupt the process.
If the information you provided is correct and the signal strength is adequate, the camera will successfully connect to the network. You’ll likely receive a confirmation on your device screen. Otherwise, you may have to re-enter the password and try connecting again.
Step Five: Ensuring That Your Hubble Camera is Linked to Wi-Fi
Successfully verifying that your Hubble Camera is connected to your wireless network is a key step in the process. Once you have connected your camera to Wi-Fi following our step-by-step guide, you will need to confirm that the connection is functional and stable.
Checking the Camera’s Network Connection
First things first, double-check that your camera is still switched on and its status light indicates that it is actively connected to a network. Next, launch the Hubble application on your mobile device or computer, and navigate to the ‘Connected Devices’ section. Here, you should find your camera listed among the devices linked to your Wi-Fi network.
Note: If you do not see your camera listed, don’t panic. Occasionally, it might take a few minutes for the camera to register in the system after it has been connected. Try refreshing your list of connected devices or restarting your Hubble application. If the camera still does not appear after a few tries, revisit the previous setup steps to make sure no errors were made.
Performing a Test Recording
Once you see your camera listed under ‘Connected Devices’, it’s a good idea to conduct a brief recording test to firmly establish that your Wi-Fi connection is stable and retained. Start recording and try moving around in front of the camera, then end the recording and play it back to make sure that the video and audio have been captured smoothly.
Remember: If you experience issues with the recording, this may indicate a Wi-Fi signal issue. Check your router’s position, the distance between the camera and the router, and if possible, minimize obstructions.
- If the issue persists, try rebooting your camera and router. If rebooting does not solve the issue, it might be worth looking into switching to a more reliable Wi-Fi connection or getting in touch with customer support.
Resolving Frequent Problems When Setting up Wi-Fi on Your Hubble Camera
Establishing a Wi-Fi connection with your Hubble Camera can sometimes be a tricky task. However, most of the issues can be addressed through basic troubleshooting techniques. Here are some common obstacles users face, and possible solutions.
1. Failure to Establish a Connection
If your Hubble Camera fails to connect to the Wi-Fi, it could result from several factors. Firstly, ensure your Wi-Fi network is not down. Try connecting another device to your network to test its functionality.
Additionally, confirm that your Hubble Camera is compatible with your network’s frequency band. Most cameras operate on a 2.4 GHz band, which might not be supported by some higher frequency Wi-Fi networks. If needed, change your Wi-Fi’s frequency band to match that of your camera.
2. Weak or Unstable Connection
If your Hubble Camera is intermittently losing connection, it might be located too far from the Wi-Fi router. Ensure your camera is positioned within the router’s range. Even physical objects like walls, floors, or furniture can obstruct the signal, so consider these factors when deciding on a camera placement.
3. The Camera Doesn’t Recognize the Network
If your camera cannot see or recognize your Wi-Fi network, the network might be hidden, or the camera might be incompatibly set to a wrong region. Be sure to set your network to be visible, and also ensure that the region in the camera’s setting matches the location of your Wi-Fi network.
4. Connection Drops When Linking Multiple Cameras
While linking several Hubble Cameras to the same network, the Wi-Fi connection could be overwhelmed, leading to connection drops. You can rectify this by checking your network’s capacity or by using network extenders to enhance the signal strength.
By identifying and addressing these common issues effectively, you can accomplish a seamless and reliable Wi-Fi setup for your Hubble Camera.
Optimizing Wi-Fi for Your Hubble Camera’s Best Performance
Maintaining a Stable Wi-Fi Connection for Hubble Camera
Ensuring that your Hubble Camera is seamlessly linked to your Wi-Fi is vital for optimal camera performance. An unstable or weak Wi-Fi connection can disrupt your camera’s footage and features, decreasing its efficiency and your overall experience. Here are some methods to help facilitate a smooth Wi-Fi connection for your Hubble Camera:
- Choose the Right Location for Your Router: The location of your router can significantly impact your Wi-Fi connection. Ensure that the router is not hidden away, behind a wall or under a table. Ideally, the router should be in a central location, as equidistant as possible from all devices that connect to it.
- Regularly Update Your Router’s Firmware: Out-of-date firmware could hamper the performance of your router and, subsequently, your Hubble Camera. Regularly updating the router’s firmware could maintain the strength and reliability of your Wi-Fi connection.
- Opt for a Wi-Fi Range Extender: If your Hubble Camera is located far from your router, a Wi-Fi range extender could be a helpful solution. This tool boosts the strength of your Wi-Fi signal, allowing for a stronger connection between the router and camera.
- Set Up a Separate Network for Your Hubble Camera: Congestion on a network – due to multiple devices using Wi-Fi at the same time – can affect the performance of your Hubble Camera. Consider setting up a separate network exclusively for your camera to ensure it readily has an optimal quantity of bandwidth.
Over time, consistent upkeep of your Wi-Fi will aid in augmenting your Hubble Camera’s performance, enabling it to provide seamless, uninterrupted service.
FAQ: How to connect hubble camera to wifi
How do I initiate the setup of my Motorola camera with the Hubble for Motorola Monitors app?
First, ensure your smartphone is connected to the Wi-Fi® network you want your camera to use. Download the Hubble for Motorola Monitors app from the app store, create an account or log in if you already have one, and select “Set Up Camera.” Follow the in-app instructions to complete the setup process.
My Motorola camera is not entering pairing mode. What should I do?
Press and hold the ‘pair’ button on your Motorola camera for 3 seconds. If the LED starts blinking, it indicates that your camera is now in pairing mode. If this doesn’t happen, please ensure your camera is charged and not too far from your router, then try again.
I hear a beep from my camera but it’s not connecting. What steps should I follow?
Make sure your smartphone and camera are connected to the same Wi-Fi® network. If the connection fails, try moving the camera closer to your router, ensure the network is operating at 2.4GHz if it’s a dual-band router, and restart the Hubble for Motorola Monitors app before attempting to connect again.
How do I reset my Hubble camera if it’s not functioning properly?
Unplug your Hubble camera and leave it unplugged for at least 20 seconds. Press and hold the ‘pair’ button while you plug the camera back in and continue to hold for another 10 seconds before releasing. This should reset the camera, and you can attempt re-pairing it with your app.
The LED on my Hubble camera isn’t flashing during the setup process. What should I do?
Press and hold the ‘pair’ button on the camera for 3 seconds or until you hear a beep. If the LED still doesn’t flash, check to ensure the camera is powered on and fully charged or connected to power, then attempt the process again.
How can I ensure my Hubble camera’s connection to Wi-Fi® is successful?
After selecting your Wi-Fi® network in the Hubble for Motorola Monitors app and entering the password, wait for the app to confirm that the camera is connected. If it doesn’t, double-check your Wi-Fi® password, ensure the network is online, and restart the connection process.
Can I connect my Hubble camera to a new Wi-Fi® network?
Yes, navigate to the Wi-Fi® settings on your smartphone, select the new network, and enter the password. Then, open the Hubble for Motorola Monitors app, go to camera settings, and update the Wi-Fi® information. Follow the prompts to connect your camera to the new network.
My Hubble camera got disconnected from Wi-Fi®. How do I reconnect?
Return to the Hubble for Motorola Monitors app and select your camera. If it’s offline, try to set up your camera again by pressing and holding the ‘pair’ button for 3 seconds and following the app’s instructions to reconnect to your Wi-Fi® network.
What should I do if my Hubble camera is not appearing in my app?
First, check whether the camera is powered on and connected to Wi-Fi®. If it is, try logging out of the app and logging back in. If the camera still doesn’t appear, it may need to be reset, following the camera’s instruction manual.
Who should I contact if I’m experiencing consistent issues with my Hubble camera?
If troubleshooting steps fail, contact Hubble support at [email protected]. Provide them with details of the issue you’re experiencing, and they can guide you through additional steps or arrange for a repair or replacement if necessary.
How do I begin the process of setting up my Hubble camera?
To start, download the Hubble Connected for Motorola app onto your mobile device from your respective app store. Once installed, open the app, and if you don’t have an account, you’ll need to create one. If you already have an account, simply log in.
What’s the function of the ‘pair’ button on my Hubble camera?
The ‘pair’ button is used to initiate the connection process between your camera and the Hubble app. Press and hold this button for 3 seconds until the camera beeps, indicating it’s ready for pairing with your app.
I’m trying to set up my camera, but it’s not going into pairing mode. What should I do?
Please check that your camera is plugged in and receiving power. Then, press and hold the ‘pair’ button for about 3 seconds. If the LED light doesn’t start blinking, repeat the process ensuring you’re holding the button long enough.
How can I set up my camera using the Hubble app?
After downloading the Hubble app and creating your account, select “Set Up Camera” within the app. Ensure your phone’s Wi-Fi® is turned on, as the app will need to connect your camera to your home Wi-Fi® network. Follow the prompts to complete the setup.
What steps should I follow to connect a Hubble camera to my home network?
Open the Hubble app on your phone, and go to your phone settings to ensure you’re connected to your home Wi-Fi® network. Then, in the app, select your camera from the list available, press and hold the ‘pair’ button on the camera, and follow the on-screen instructions to connect.
I’m having trouble with the camera setup in the Hubble Connected app. What can I do?
First, ensure your phone is connected to Wi-Fi® and you’re logged into the Hubble app. Press and hold the ‘pair’ button on the camera until it’s ready for pairing, then follow the in-app instructions. If issues persist, try restarting your camera and repeating the process.
How long do I need to hold the ‘pair’ button during the setup process?
Hold the ‘pair’ button for 3 seconds. You should hear a beep or see the LED light start blinking, indicating that the camera is ready to pair with your device.
How do I know my Hubble camera is connected to the correct Wi-Fi® network?
After the setup process, make sure that your Hubble camera shows as connected in the Hubble app. You can check the network details in the app to confirm it’s connected to the desired network.
My Hubble camera isn’t showing in the app after setup. What should I do?
Ensure your camera is on and connected to Wi-Fi®. If it’s not visible, try logging out of the app and logging back in. If the issue persists, reset your camera according to the manual and try adding it to the app again.
My Hubble camera is connected, but how do I start using it?
Once your connection is successful and your camera shows up in your Hubble app, you can begin using it by selecting your camera from the list and accessing its live feed or settings, depending on what you want to do. If you encounter issues, ensure your phone and camera remain on the same Wi-Fi® network.
How can I start the process to setup my Hubble camera?
First, download the Hubble Connected app onto your mobile device from the app store. Once you have the app, open it and follow the on-screen instructions to set up your Hubble camera.
I’ve heard about the ‘pair’ button on the Hubble camera. How do I use it?
To initiate the pairing process, press and hold the ‘pair’ button on your Hubble camera for about 3 seconds until you hear a beep or notice the LED indicator blinking. This means your camera is now in pairing mode and ready to connect with the app.
How do I connect the camera to my mobile device using the app?
Open the Hubble Connected app on your device. Ensure you’re connected to the Wi-Fi® network to which you want the camera to connect. In the app, select “Add Camera” and follow the prompts. When asked, press and hold the ‘pair’ button on the camera and wait for the connection to establish.
What should I expect once I press the ‘pair’ button on the camera?
After pressing and holding the ‘pair’ button for about 3 seconds, the Hubble camera should emit a beep, indicating it’s ready for pairing. At this stage, you can proceed with the setup on your app.
Can I use the HubbleClub app for my Hubble camera setup?
Yes, if you have a HubbleClub camera, you can use the HubbleClub app. Download the app onto your mobile device, open it, and follow the setup instructions similar to the standard Hubble Connected app.
After setting up, how can I check if my Hubble camera is connected to the right Wi-Fi® network?
Go to the settings section within the Hubble app and select your camera. There, you should see details of the Wi-Fi® network to which your camera is connected. Ensure it matches the network you intended to connect to.
My Hubble camera went offline. How do I turn it back on and ensure it connects correctly?
Turn the camera back on by ensuring it’s properly powered. Then, open your phone settings and check the Wi-Fi® connections available. Make sure your phone is connected to the desired network. In the Hubble app, select your camera from the list and it should automatically reconnect. If issues persist, you may need to redo the setup process.
What are the initial steps to set up my Hubble camera using Wi-Fi®?
Begin by downloading the Hubble for Motorola Monitors app onto your mobile device. Once installed, open the app and select the option to set up a new camera. Ensure your phone is connected to the Wi-Fi® network you want the camera to use. When prompted, press and hold the ‘pair’ button on the camera until you hear a beep, indicating the camera is ready for pairing. Follow the in-app instructions to complete the setup.
How do I know if my Hubble camera has entered pairing mode successfully?
After pressing and holding the ‘pair’ button on your camera for approximately 3 seconds, listen for a beep or a verbal confirmation like “ready for pairing,” and watch for a flashing LED light. These signals indicate that the camera has entered pairing mode and is ready to connect to your Wi-Fi® network through the app.
My Hubble camera setup was unsuccessful; what should I do with my parent monitor during a retry?
It’s recommended to turn off your parent monitor to prevent any possible interferences or conflicts during the setup process. After turning off the monitor, retry the setup process by pressing and holding the pair button on your camera again, ensuring your phone is connected to the correct Wi-Fi® network, and following the instructions in the Hubble app. If repeated attempts fail, consider reaching out to Hubble support for further assistance.